
You click the magnifying glass icon or the Start button, ready to launch an app or find a file. You start typing, but… nothing happens.
The cursor blinks, but no letters appear. Or worse, the search box doesn’t open at all.
“Why is my Windows Search broken?”
This is one of the most annoying bugs in Windows 10 and 11. Since we rely on Search for everything from launching Chrome to finding settings, a broken search bar cripples your workflow.
Usually, this happens because the “SearchHost.exe” process has suspended itself or the indexing service is corrupted. In this guide, I will show you how to restart the search process and get your keyboard working again.

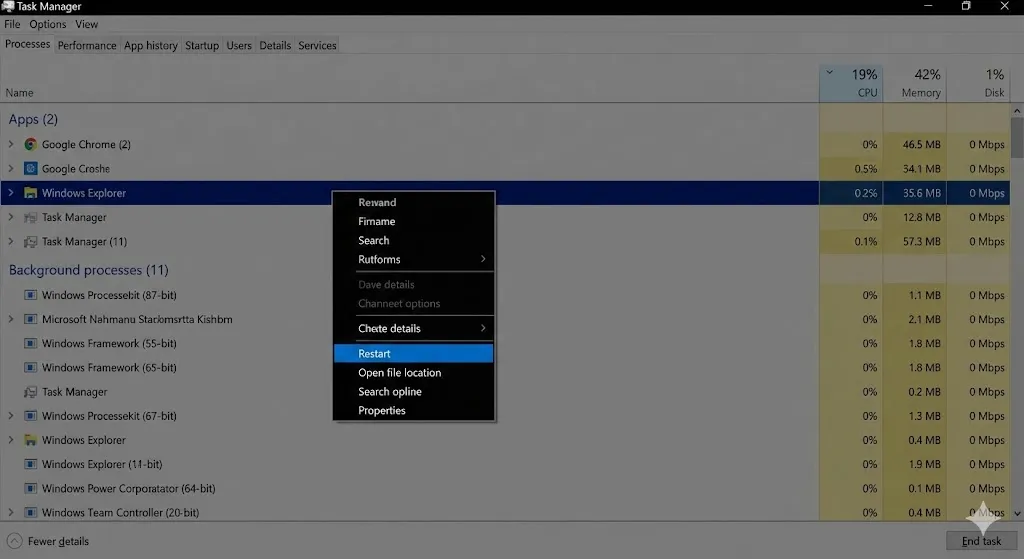
Method 1: Restart “Windows Explorer” (The Quickest Fix)
The search bar is part of the Windows Explorer interface. Restarting Explorer usually kickstarts the search function instantly.
- Right-click the Taskbar (or Start button) and select Task Manager.
- In the “Processes” tab, scroll down to find Windows Explorer.
- Right-click it and select Restart.
- Your screen will flicker/flash for a second. This is normal.
- Try typing in the search bar again.
Method 2: Restart the Search Service
If restarting Explorer didn’t work, let’s target the Search process directly.
- Open Task Manager (Ctrl + Shift + Esc).
- Go to the Details tab.
- Look for SearchHost.exe or SearchUI.exe.
- Right-click it and select End task.
- Select End process when asked.
- Windows will automatically restart it immediately. Check your search bar now.
Method 3: Run the Search and Indexing Troubleshooter
Microsoft knows this feature breaks often, so they built a specific repair tool for it.
- Open Settings > System > Troubleshoot.
- Click Other troubleshooters.
- Find Search and Indexing and click Run.
- Check the boxes that apply (e.g., “Can’t start a search or see results”).
- Let Windows apply the fixes.
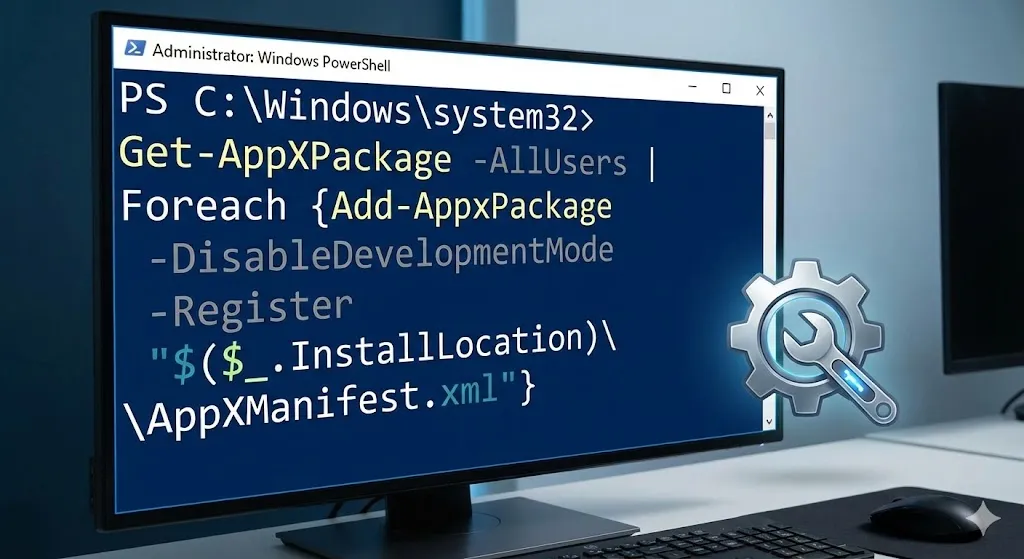
Method 4: The PowerShell Reset Command (Advanced Fix)
If the simple fixes fail, we need to forcefully re-register the Windows Search app using PowerShell.
- Right-click the Start button and select Windows PowerShell (Admin) or Terminal (Admin).
- Copy and paste the following command carefully:
Get-AppXPackage -AllUsers | Foreach {Add-AppxPackage -DisableDevelopmentMode -Register "$($_.InstallLocation)\AppXManifest.xml"} - Press Enter. You might see some red text errors—ignore them.
- Once it finishes, restart your computer.
[🖼️ Insert Image 3 Here]
Method 5: Check the “Windows Search” Service
Make sure the background service hasn’t been disabled by mistake.
- Press Windows Key + R, type
services.msc, and hit Enter. - Scroll down to find Windows Search.
- Double-click it.
- Ensure Startup type is set to Automatic (Delayed Start).
- If the Service status is “Stopped”, click Start.
Frequently Asked Questions (FAQ)
Q: Why does this happen after an update? A: Windows updates often reset system permissions. If the Search app loses permission to run in the background, it freezes. Method 4 usually fixes this.
Q: Does rebuilding the index help? A: Yes, but it takes a long time. If your search works but can’t find files, rebuilding the index is the solution. If you can’t type at all, follow the methods above.
Q: Is Ctfmon.exe related? A: Yes! ctfmon.exe controls keyboard input. If you can’t type anywhere (not just search), press Win + R, type ctfmon.exe, and hit Enter to restart it.
Conclusion
A frozen Windows Search bar is a productivity killer. In 90% of cases, simply restarting Windows Explorer (Method 1) or ending SearchHost.exe (Method 2) brings it back to life.
Don’t let a buggy Start menu slow you down—fix it in seconds!
Did the Task Manager trick work for you? Tell us in the comments below!